 Hello Everyone! Welcome back for Day 5 of my Christmas Series for 2018! I hope everone is enjoying this series and being inspired to dig in their stash and create beautiful Holiday cards (or TAGS!) for this season.... So let's jump in... for this project I am featuring Mama Elephant and their 'Joy Ornament' Stamp and Die Set! 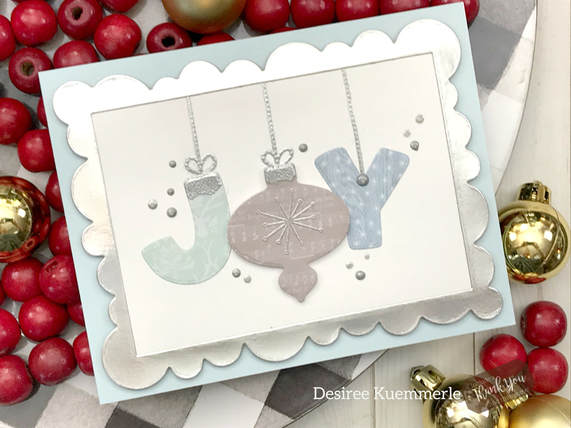 I first thought to stamp out my images and use the dies of course to cut them out.... But when I just saw the shape of the die I knew I could just dig into my massive paper stash and create some fun images! 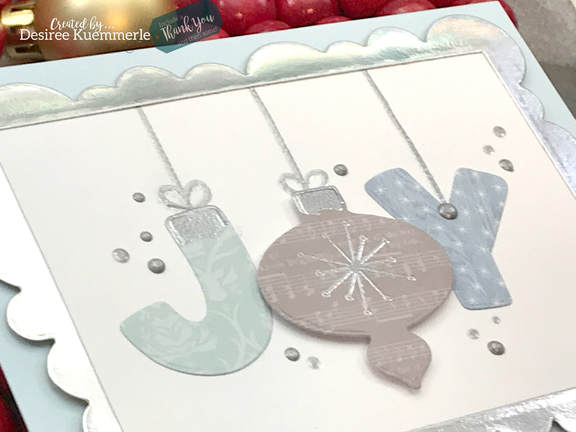 I used my Pink and Main Cloudy Die to frame my images after they were cut. Added some embossing and gloss drops to embellish this playful card for the holidays! Here are just some of the products used to make this card... Mama Elephant 'Joy Ornament' Stamp Set Mama Elephant 'Joy Ornament' Die Set Pink and Main Cloudy Frame Die Set Tim Holtz Alterations Silver/Gold 8 x 8 Metallic Paper Pad Click the video below to see all the craft details how to put this card together! When you are done watching the video, and want to see more, CLICK HERE to go to my YouTube Channel ...
Don’t’ forget to LIKE and SUBSCRIBE to my channel! Always Remember... Be Inspired, Be Creative, ENJOY and SHARE what you create today! ~ Desiree
0 Comments
 Hello Everyone! Welcome back for Day 4 of my 2018 Christmas Series! Today I wanted to color with some color pencils, so I pulled out my Arteza 72 color set! I must say these are great pencils to color with for any level of creator! Now what to color! I chose one of the Suzy's Watercolor panels from Simon Says Stamp. Now I know I said water color panel, but these are perfect for any coloring medium, plus with water color paper it is perfect to use color pencils with since it has a great tooth to pick up the pigment! 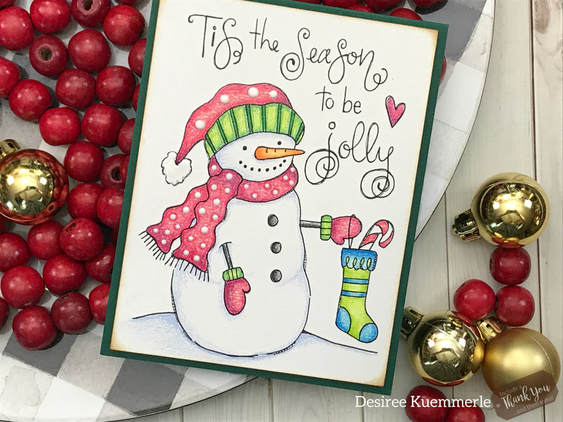 I made sure my pencils were sharp and bright and I was ready to get coloring. The panel I chose is from her Snowmen series that was recently released through Simon Says. 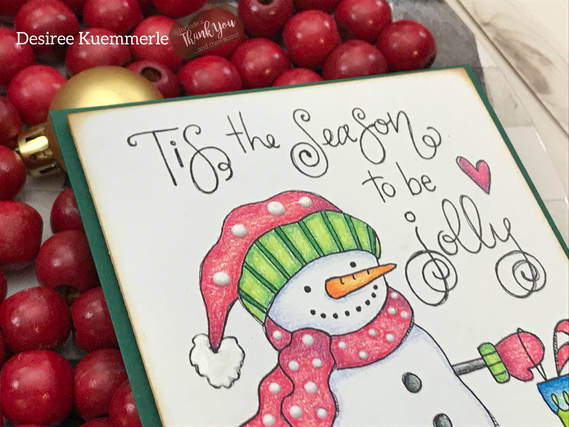 For each color I chose three shades, but there are times like green for example the color I use for my deepest shade is actually blue! 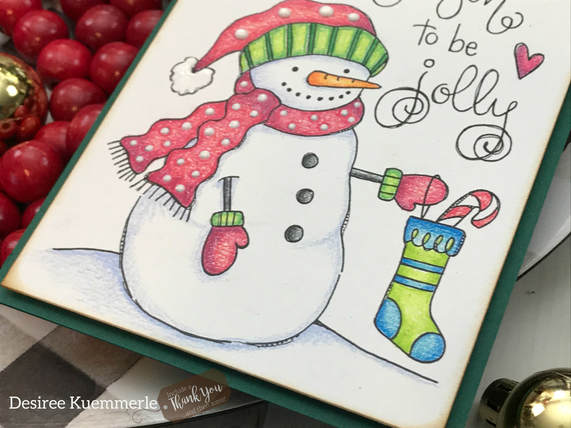 And for my reds, I like to use a dark purple! That for em is the beauty of color pencils, I can work them just like an alcohol marker, and use those same techniques for when I color. Here are just a few of the products I used for this card... Suzy's SNOWMEN Water Color Panel Arteza 72-count Color Pencils Nuvo Gloss Drops - White Click the video below for all the crafty details and a few tips and tricks for how I use colored pencils! When you are done watching the video, and want to see more, CLICK HERE to go to my YouTube Channel ...
Don’t’ forget to LIKE and SUBSCRIBE to my channel! Always Remember... Be Inspired, Be Creative, ENJOY and SHARE what you create today! ~ Desiree 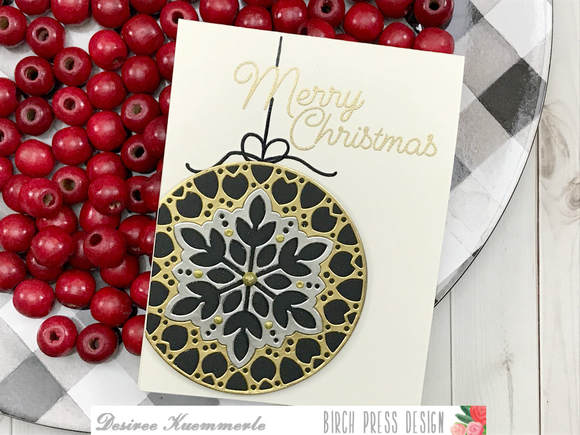 Hello Everyone! Today I am up on the Birch Press Design Blog making another project using the ISSA Snowflake, but this time only Layer A! I had to make an ornament as my focal point on my card. What I love about these dies is you can either use all to layer your image or you can chose just one layer to create your card. What is even better with this set is there are multiple areas within this die design to chose from to show on your design! During the Holiday season I always chose strong bold colors for my card making. This time is no different! Gold mirror, Silver mirror and Black, I think that is pretty bold, right? But you can choose any colors that will fit your look! 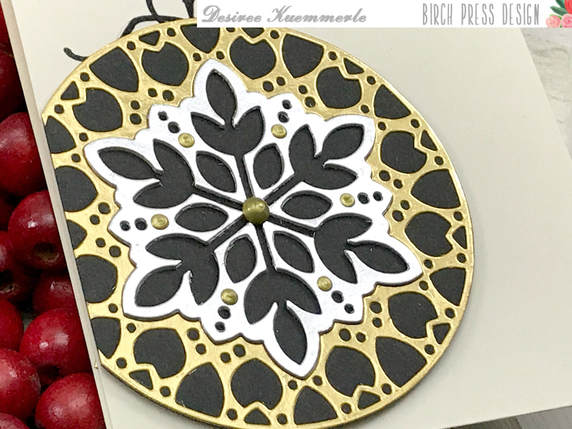 I die cut my pieces, one in the gold and another in the silver, but I also cut the center portion one more time. This way the center of my ornament would have more dimension and set higher than the rest! Once all my pieces were die cut, I glued them all together using my liquid adhesive. I set it aside so it can dry, placing acrylic blocks on top for added weight! Once all set, I placed it onto my card base using double sided foam tape, because we can never have too much dimension! 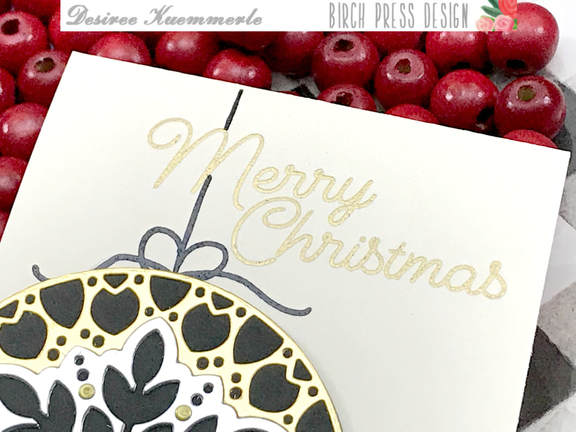 My sentiment, Merry Christmas, is from the ‘Joy & Peace Clear Stamp Set. I used gold embossing powder and heat set just above the ornament directly onto my standard A2 size card base (4 1/4 inches x 5 1/2 inches). I grabbed my black embossing pen and drew a string with a bow for my hanging ornament and heat set it with clear embossing powder! Click on the video below to see all the crafty details... When you are done watching the video, and want to see more, CLICK HERE to go to my YouTube Channel ...
DON'T FORGET TO LIKE AND SUBSCRIBE TO MY CHANNEL! Always Remember... Be Inspired, Be Creative, ENJOY and SHARE what you create today! ~ Desiree  Hello Everyone! Welcome back for Day 3 of my 2018 Christmas Series! Today I am featuring Rubber Stamp Tapestry and their wonderful peg stamps. if you have seen any of my previous videos, we know I am a huge fan of this product! So versatile and unique... perfect for any paper craft project you have to create! These stamps are made out of red rubber... so I thought glue and glitter! So Arteza had contacted me a little bit ago and asked if I would be interest in looking at their 48-color glitter pack... so here it is! 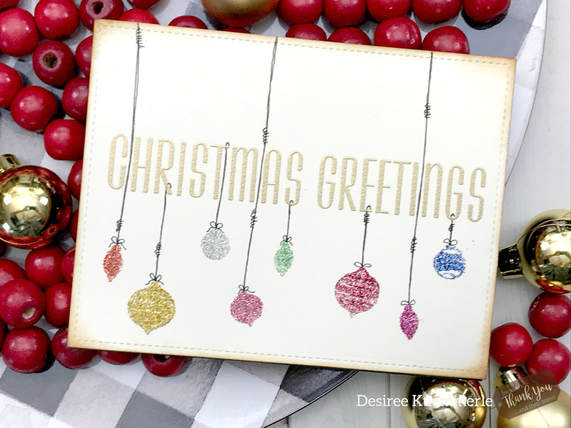 The peg stamp set I am using today is called "Hello Mistletoe". Beautiful Ornaments and Greenery to fill any card up... The ornaments are what really caught my eye and thought this technique would be perfect! I used a Zig 2-way glue pen and placed some glue down onto a scrap piece of paper. Placed my stamp into the glue and dabbed off the excess... Chose my color of glitter for that ornament and placed a little over the stamped area! 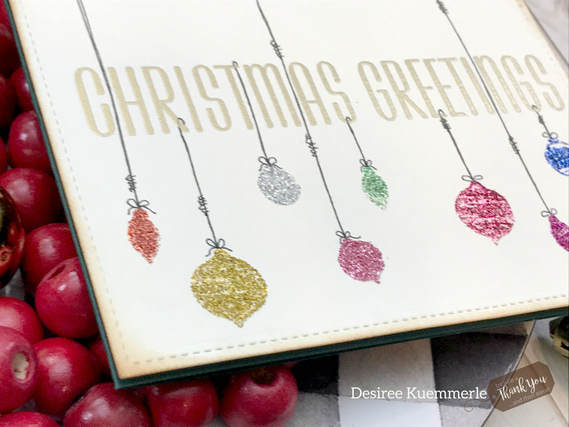 We may not have all the beautiful detail these stamps have, but what shine and glimmer we get using the glitter as the color instead of ink! Here are just a few of the products I used for this card... Rubber Stamp Tapestry - Hello Mistletoe Stampers Anonymous - ChristmasTime Stamp Set Zig 2-way glue pen Arteza 48-color Glitter Pack Click the video below to see just how easy this is to create! When you are done watching the video, and want to see more, CLICK HERE to go to my YouTube Channel ...
DON'T FORGET TO LIKE AND SUBSCRIBE TO MY CHANNEL! Always Remember... Be Inspired, Be Creative, ENJOY and SHARE what you create today! ~ Desiree  Hello Everyone! Welcome back for Day 2 of my Christmas Series for 2018! Today I am going to feature Simon Says Stamp! This card is kinda still in the area of completely simplistic... just a sentiment! 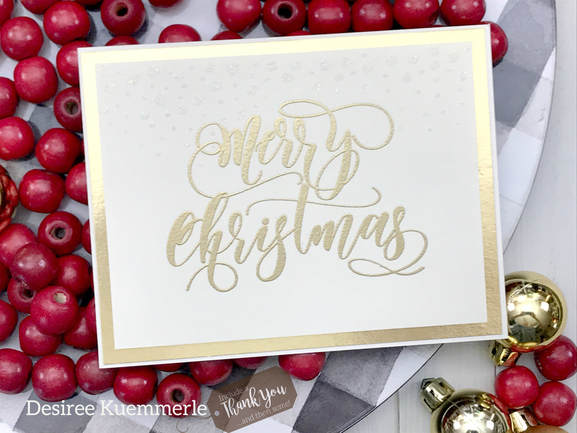 With only a sentiment set in a beautiful font, some embossing power and mirror card stock! Your card for the holidays is sure to be sophisticated and elegant all at once! 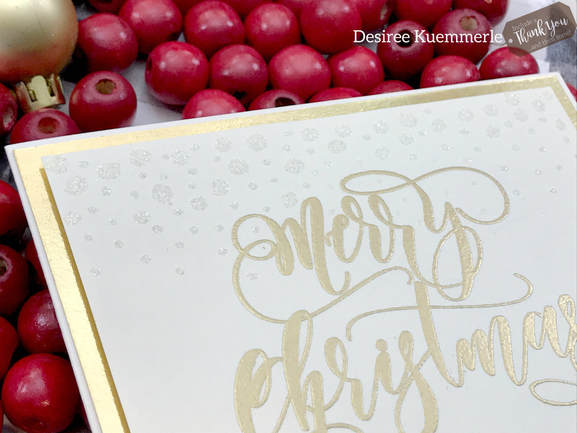 Don't think you can step it up! Of course we can, just add some glue and glitter and we have sparkle and shimmer! LOL Yes it is that simple... Here are just a few of the products I used for this card... SSS Merry Christmas Sentiment Stamp Recollections Gold Embossing Powder Quickie Glue Pen Gold/Silver Metallic Paper Pad Still thinking there was more to this card? Click the video below to see all the craft details... When you are done watching the video, and want to see more, CLICK HERE to go to my YouTube Channel...
DON'T FORGET TO LIKE AND SUBSCRIBE TO MY CHANNEL! Always Remember... Be Inspired, Be Creative, ENJOY and SHARE what you create today! ~ Desiree |

Getting Inky, suffering paper cuts, cutting using metal dies and stamping everything... These are just some of the fun and mischievous ways together we will create paper art! So stay and be motivated and inspired! ...and let me know what inspires your creativity!


Designer/Owner/Creator - Desiree
Well, hello there everyone! My name is Desiree Kuemmerle and I live in Lansdale, PA with the hubs of over 20 years and our furry bot Max! I am fluent in Crafting, a Master Paper Manipulator and a violator of all that makes sense...
Since about the time I spoke my first word, I’ve been an avid crafter alongside my mom and sister. You name the craft and I’ve probably bought it, collected it, tried it and finally stored it. Right now, getting Inky, suffering paper cuts, cutting with metal dies and stamping everything, whether it moves or not makes me smile and I must pass that along to everyone I know and don’t know! 
Inspiration Crafty Designs for...
 
DESIGN TEAM
Just a few Great places for all your CRAFTY needs!!!
 
Old Posts Never Die
November 2022
Search by Categories
All
|
 RSS Feed
SEARCH WEBSITEServiceslet's connect SOCIALLY! |
|
copyright!All content and designs included on my sites, social media and e-commerce webpages (i.e. Etsy, Facebook, ONLINE Courses and Website Store) are under COPYRIGHT © Desiree Kuemmerle, Include a Thank You, Desiree Tangles with Paper and Desiree Kuemmerle, CZT. Original artwork and designs are shared for your personal creations and inspiration only, unless otherwise stated by Desiree Kuemmerle.
© COPYRIGHT 2017-2024. by Desiree Tangles with Paper and (a.k.a.) Include a Thank You ...and then some! - Desiree Kuemmerle ALL RIGHTS RESERVED.
Include a Thank you
|