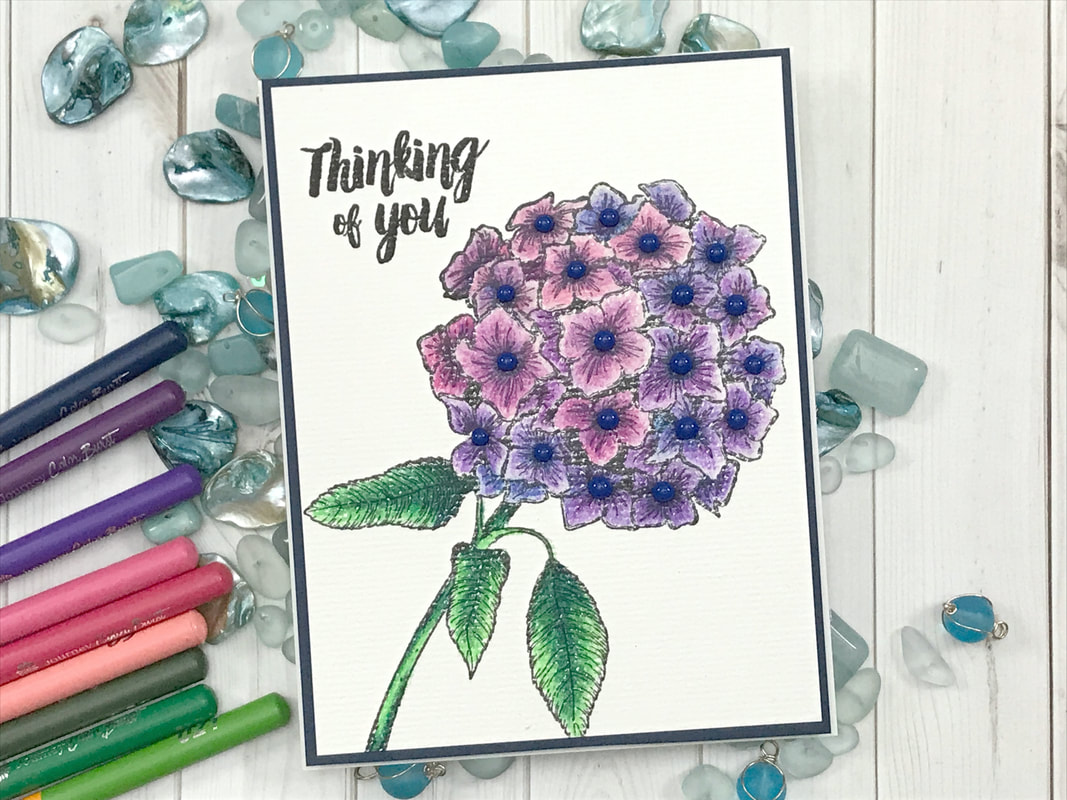
 Hey Everyone! I am here being creative with Fun Stampers Journey! For today's project I am using the Bloom Burst Stamp Set along with their Color Burst Pencil Set! I chose to use my Arteza Water Color Paper. Now know, this paper has a very rough feel... that is something that I do look for when coloring with colored pencils... I used my stamp positioning tool to stamp my image and sentiment... I knew there was going to be multiple stamps, LOL... 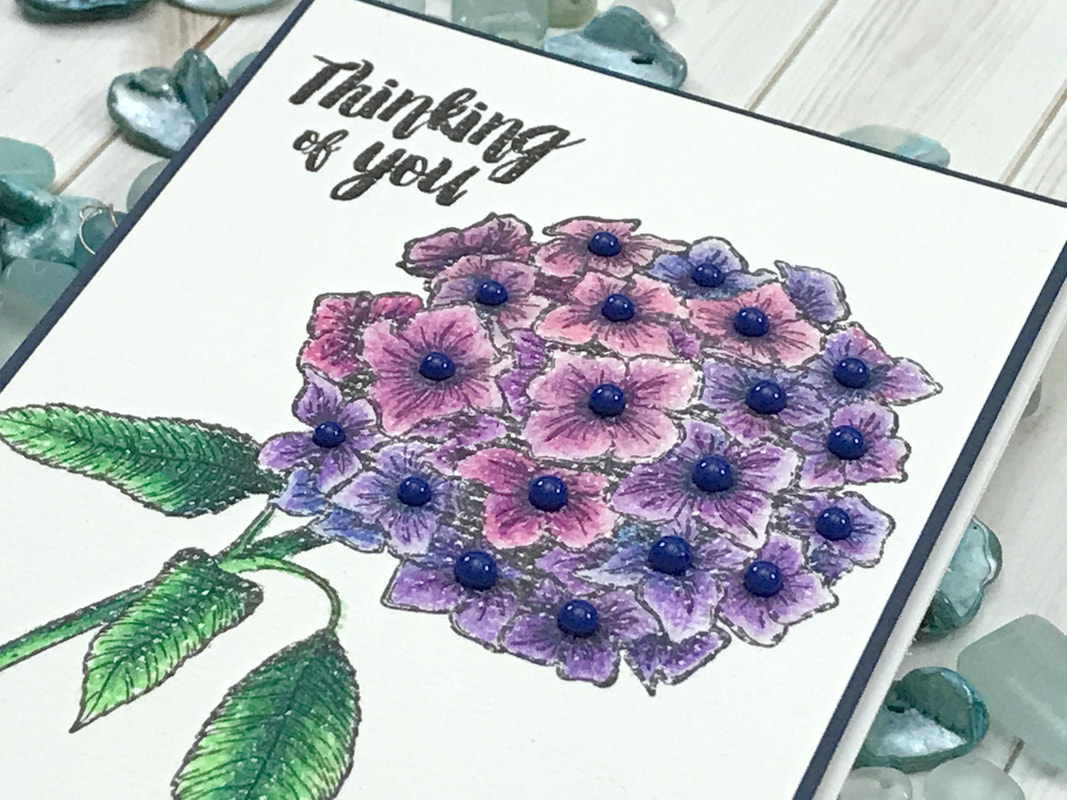 Let the coloring begin... I really liked these pencils and must create with them more... Very pigmented and smooth... I feel another video coming out about these... LOL Here are just a few products used for this project... Fun Stampers Journey – Bloom Burst Stamp Set Fun Stampers Journey – Color Burst Pencil Set Arteza Water Color Paper Pad – Premium Prismacolor Colorless Blender Pencil Click on the video below to see all the crafty details!... When you are done watching the video, and want to see more, CLICK HERE to go to my YouTube Channel ...
Don’t’ forget to LIKE and SUBSCRIBE to my channel! Always Remember... Be Inspired, ENJOY, LAUGH and ALWAYS BE CREATIVE! ~ Desiree
0 Comments
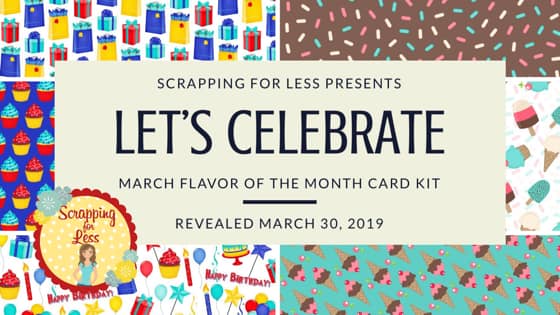 Hello Everyone! I am here today Celebrating with Scrapping for Less! I cannot believe it has been 2 years since Scrapping for Less unveiled the first Flavor of the Month Card Kit. From selling 10 kits that first month; 5 of those being subscriptions to hundreds each month only 2 years later; I feel truly blessed to be able to bring this program to you each month. But not only that, I feel truly blessed to call each and every one of my customers part of the SFL family. So, this month we bring you a whole kit of Celebrations, Ice Cream Celebrations, Baby Celebrations, Birthday Celebrations, and Friendship Celebrations. Thanks so very much for all of your support. Make sure you click on the links below to get your kit and stay connected! FLAVOR OF THE MONTH CARD KIT DOWNLOADS BLOG SHOP Let's get to some inspiration! Here are three cards I made from the kit! Stop by my YouTube Channel to see more! 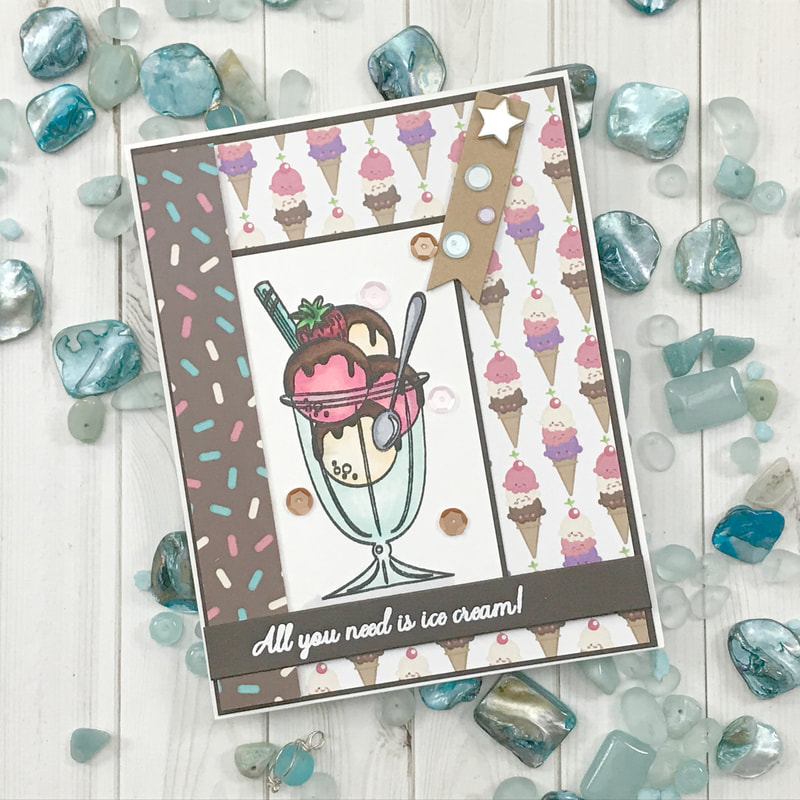 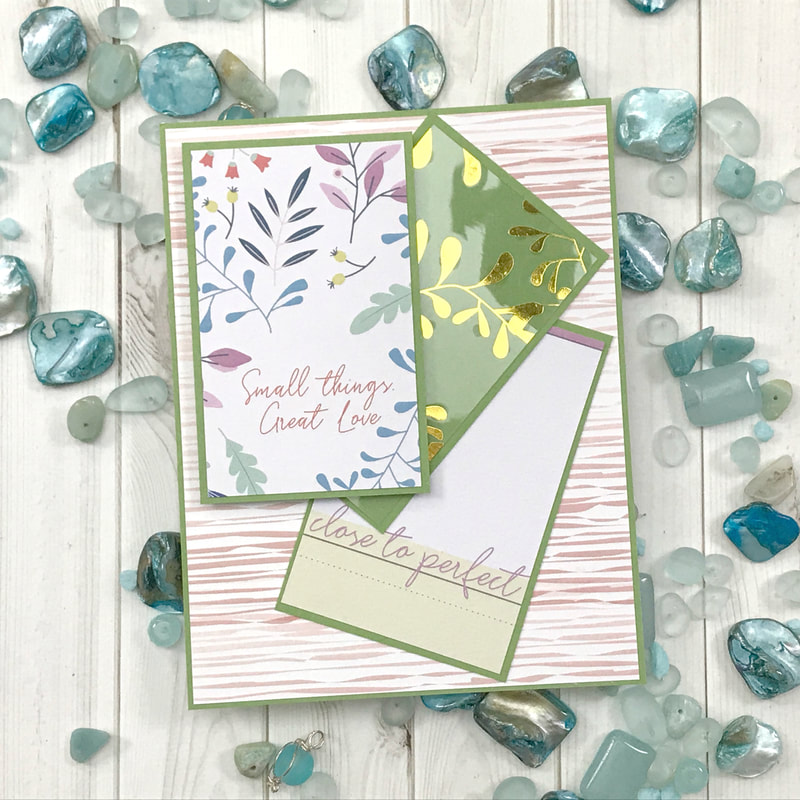 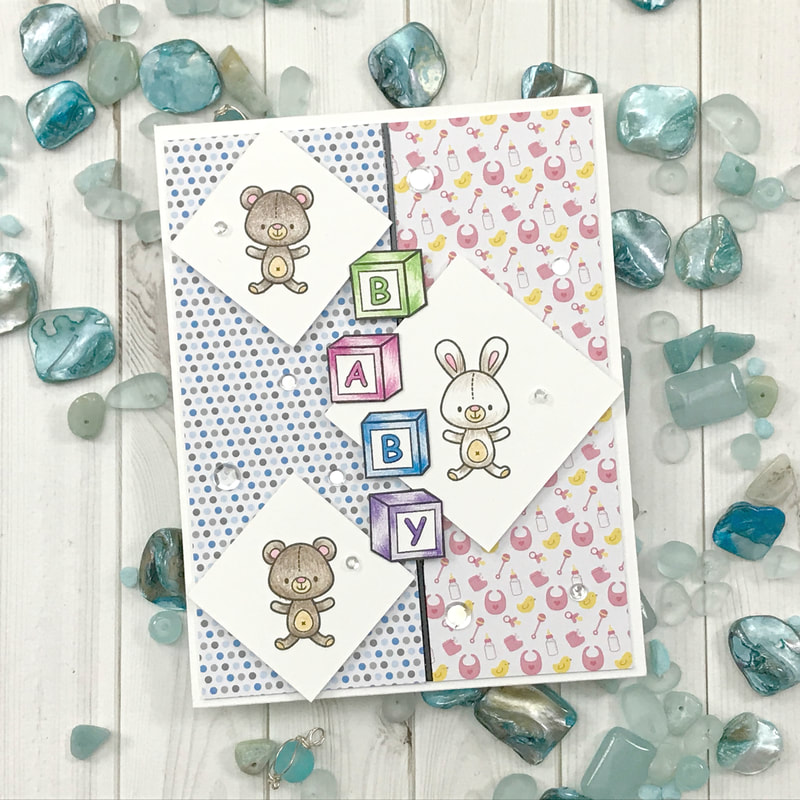 Curious to see what you will get in your Scrapping for Less Flavor of the Month Card Kit for March 2019! Just check out the photos below! 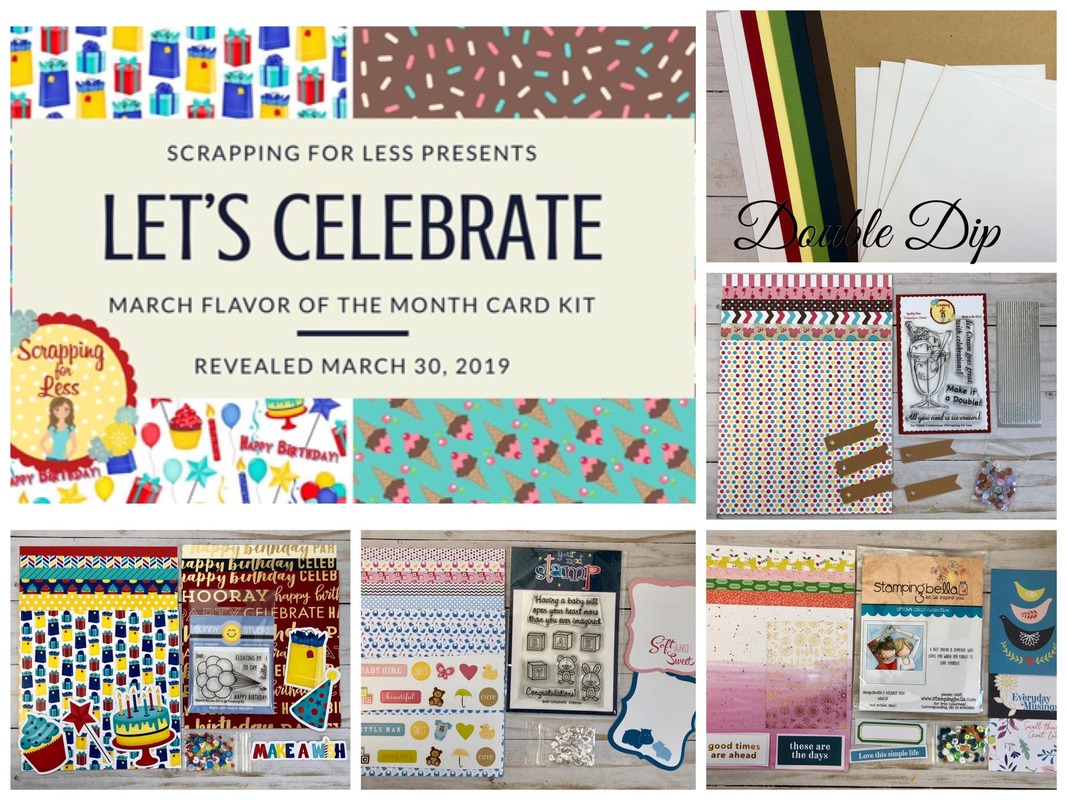 Double Dip Sundae  Banana Split Sundae Hop along and see the inspiration the Design Team and Guest Designers have for you today! SFL Katie LeeAnn Lynnea Luci Courtney Stacy Teresa Jenn It's ME --- YOU ARE HERE!!! Andrea Shell Cassie Trask Jennifer Holder Christine Make sure you also put your name in for that Rafflecopter prize!
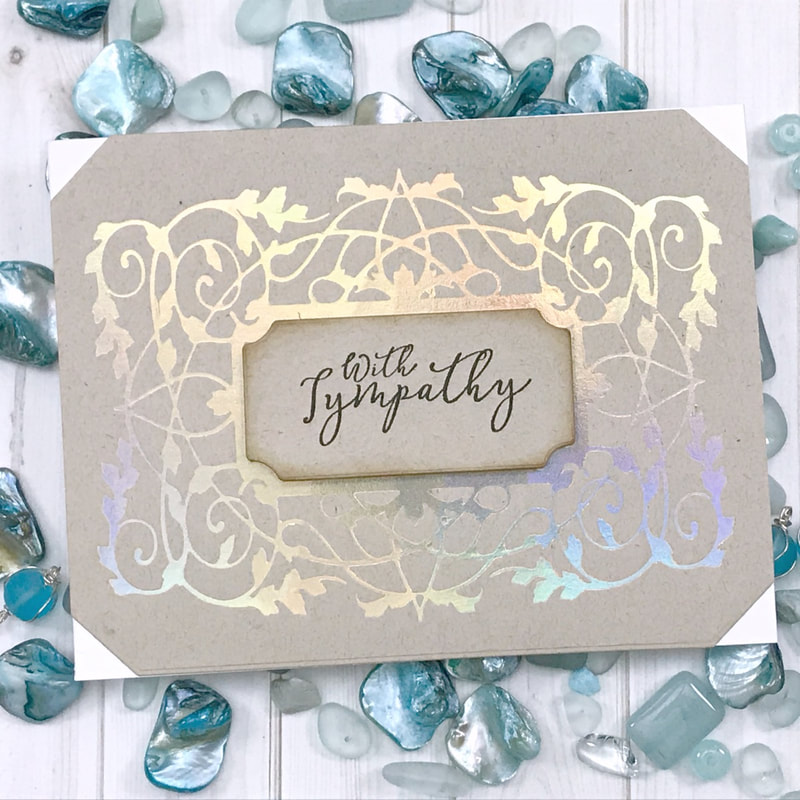
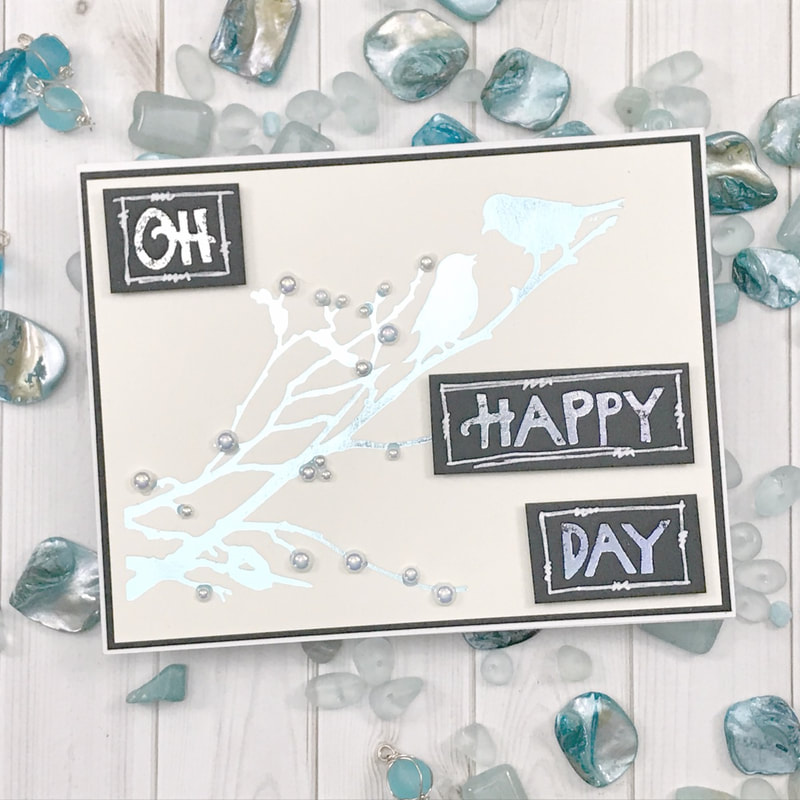
Thanks again for hopping with us, and Happy Crafting! But Always Remember... Be Inspired, ENJOY and Always Be Creative!!! ~ Desiree 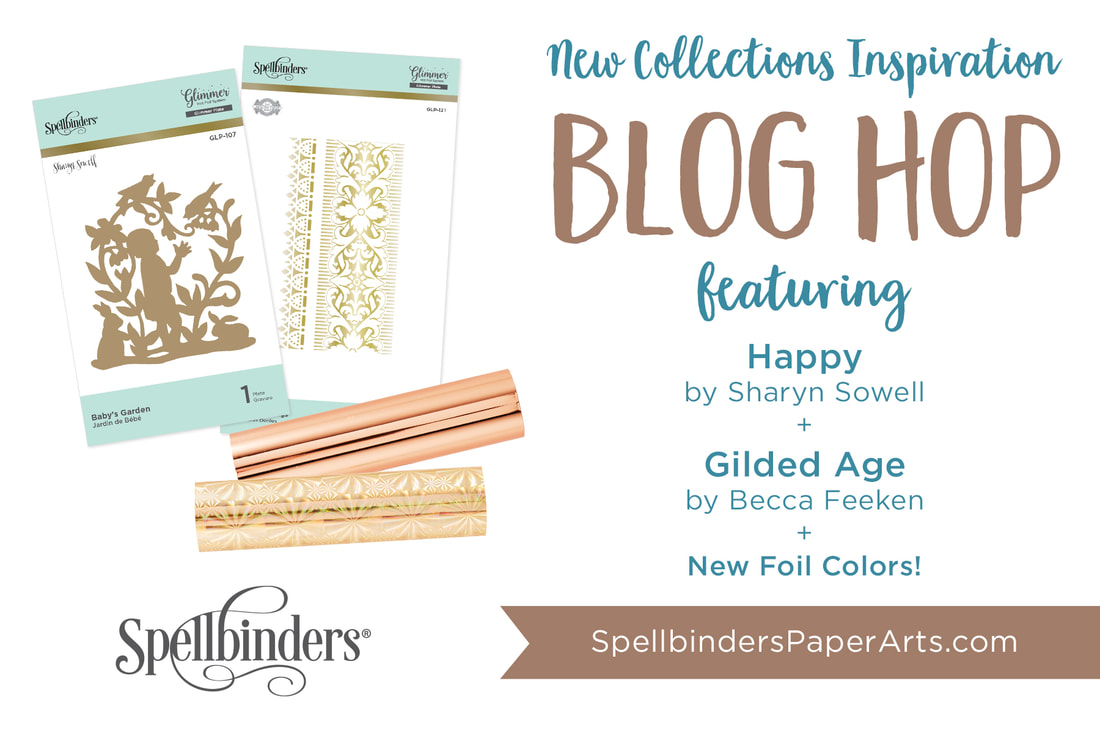 Hello Everyone! I am so "happy" to be here today with Spellbinders and joining them for their Blog Hop! Today they are celebrating two new collection releases! Now make sure you check it all out! There is a giveaway and of course a video! LOL ENJOY! The first is by Becca Feeken and it is called Gilded Age! This collection is bold and regal and give strength to any design you create! The second is Happy by Sharyn Sowell... Beautiful images for your card making to bring a smile to any of your recipients! 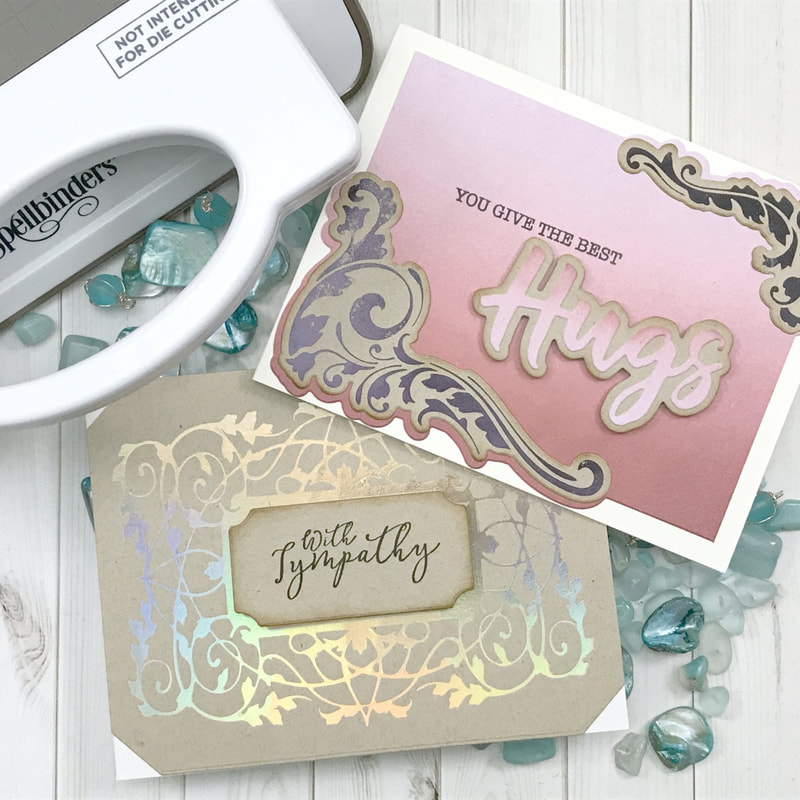 From the Gilded Age Collection I focused on the Glimmer Hot Foil System. These are beautiful frames creating strong accents for your sentiments...
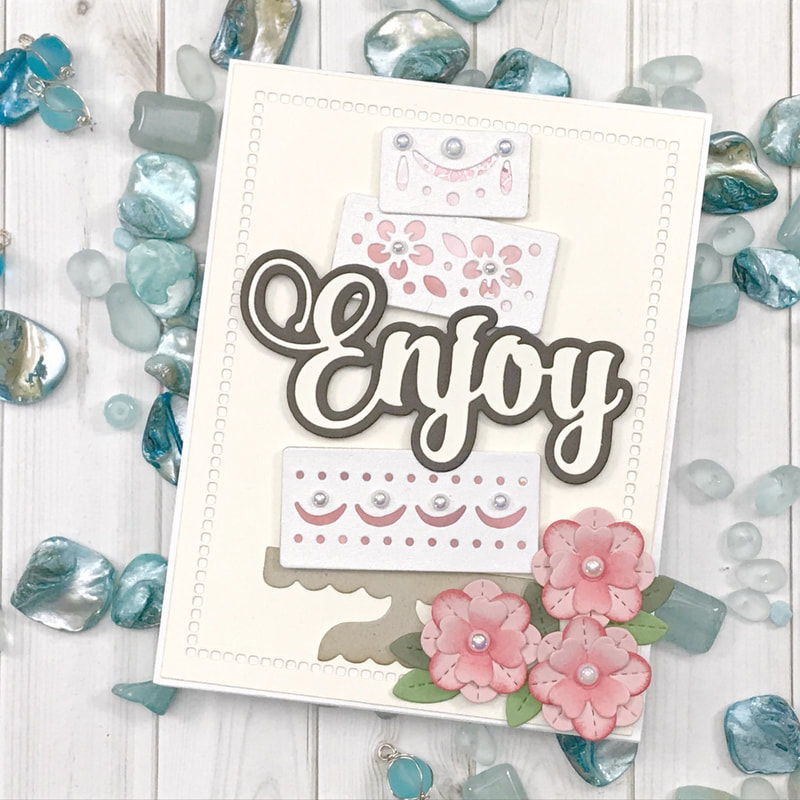
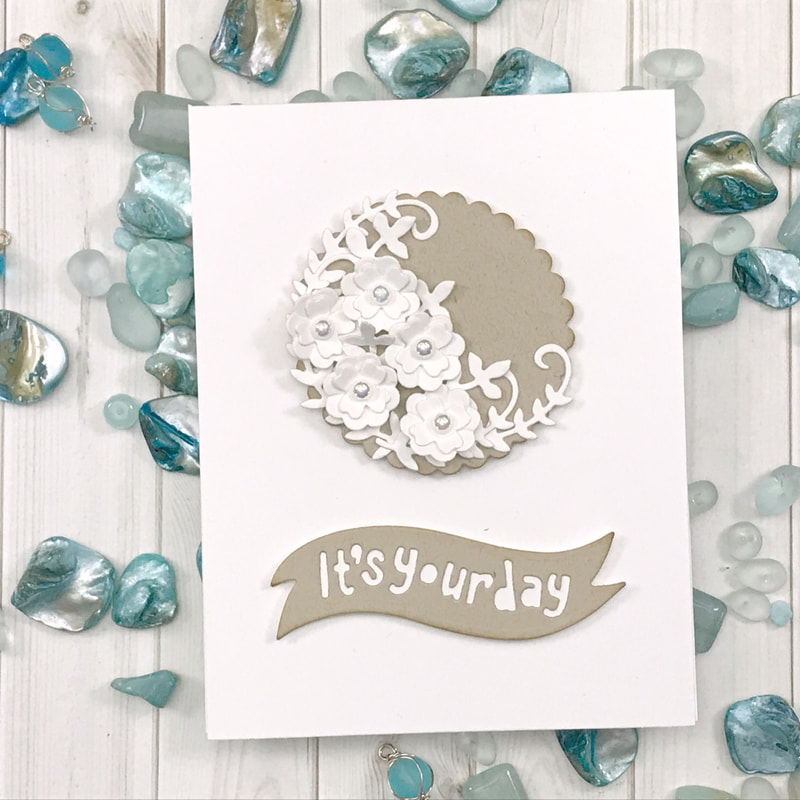
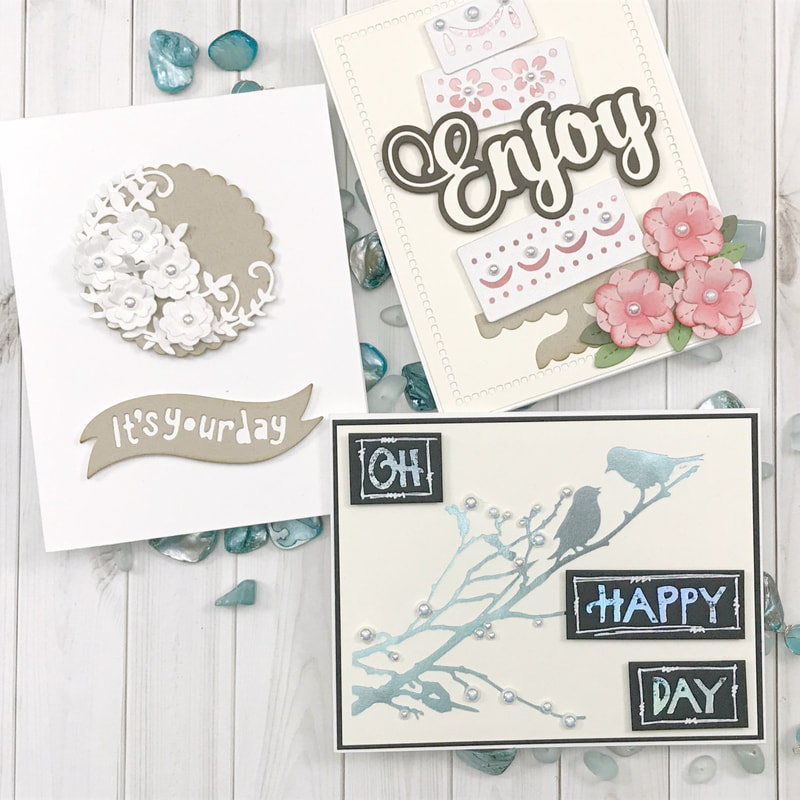 The Happy Collection celebrates everything around us but especially you! This is perfect for any card or layout we make!
Glimmer plates and dies are part of this collection.... Spellbinders - GIVEAWAY!To celebrate this release, we are giving away a $50 gift certificate to 3 lucky blog readers – selected from the comments across all of the blogs in the hop. Giveaway closes on Sunday, April 7th 11:59 pm EDT. Winners will be announced in our blog hop post the following Monday. Winner is responsible for shipping cost, duties and taxes. Make sure you keep hopping for even more inspiration! Spellbinders Becca Feeken Sharyn Sowell Tina Smith Hussena Calcuttawala Mona Tóth Janette Kausen Laura Volpes Jacquie Dean Melody Rupple YOU ARE -->Desiree Kuemmerle<-- HERE!!! Anna Komenda Zinia Redo Just a few of the products I used for today's projects! Spellbinders – Glimmer Plate – Vintage Frame Spellbinders – Glimmer Plate – Gilded leaves Shaped Panel Spellbinders – Glimmer Plate – Oh Happy Day Spellbinders – It’s Your Day Die Set Spellbinders – Celebrate with Cake Spellbinders – Glimmer Foil – Aura Spellbinders – Glimmer Foil – SkyBright Spellbinders – Glimmer Foil – Prism Spellbinder Platinum 6 Die Cutting Machine Spellbinders Glimmer Hot Foil Machine Click the video below to see all the crafty details! When you are done watching the video, and want to see more, CLICK HERE to go to my YouTube Channel ...
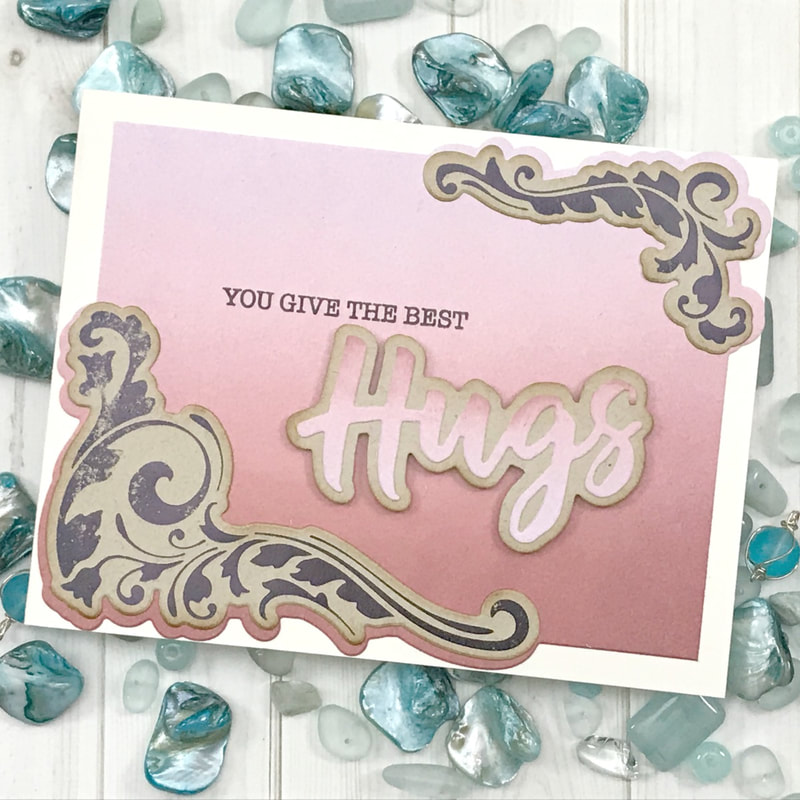
Don’t’ forget to LIKE and SUBSCRIBE to my channel! Always Remember... Be Inspired, ENJOY, LAUGH and ALWAYS BE CREATIVE! ~ Desiree 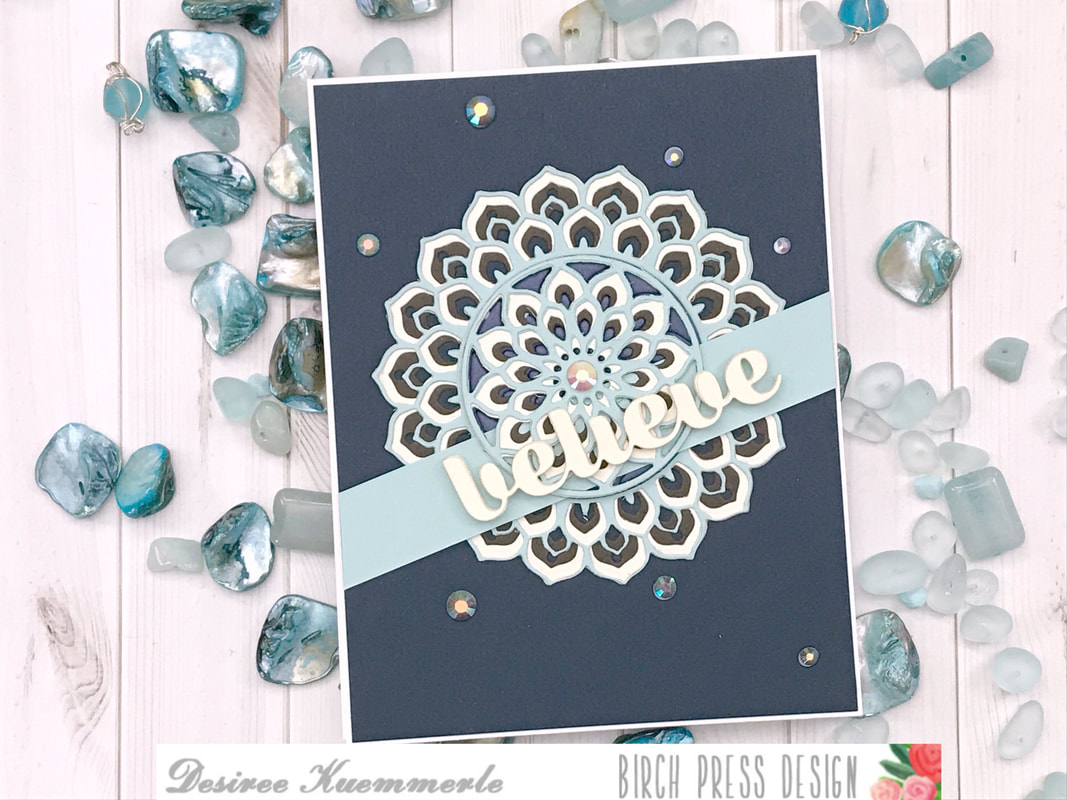 Hello Everyone! I am back today with another Design Team Project for Birch Press Designs! We are going to work with the Calen Layering Die Set and add a sentiment using the Believe Sugar Script die. The best place to start always is let’s get out pieces die cut all at once. So, we will have a die cut from each layer of Calen and I decided to cut 6 from ivory card stock for my sentiment. 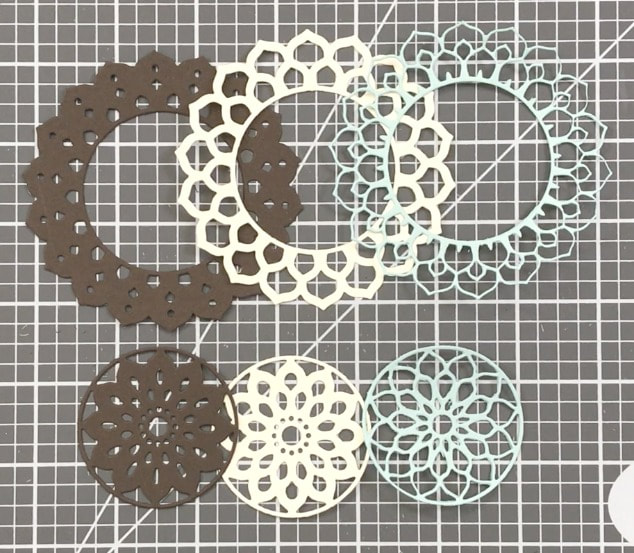 Once we have every die cut, we can now start gluing it all together! 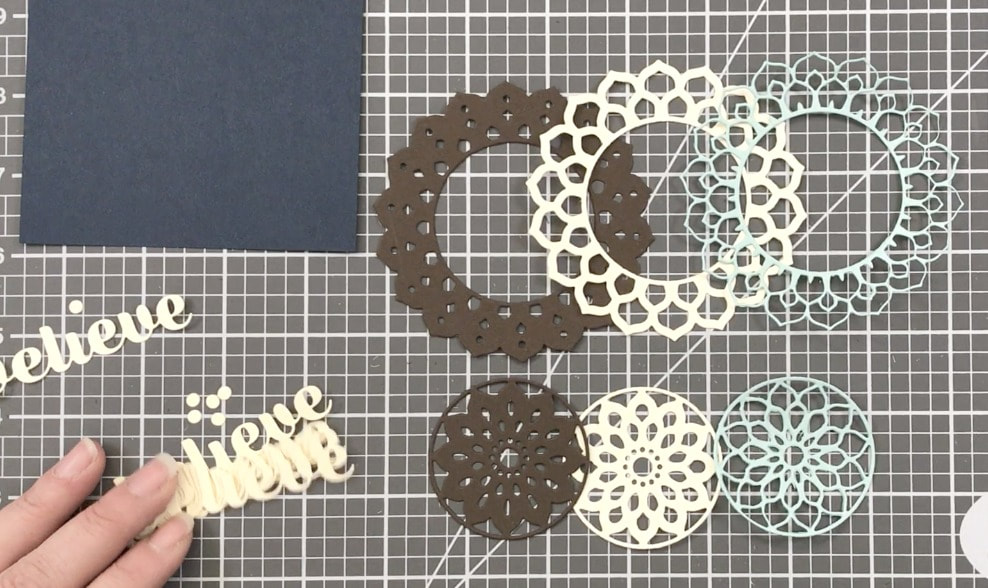 I started with my sentiment, by cutting 6 this will create a heavy chip board piece across our focal point. Now we can glue together the three layers of Calen. I chose a brown, Ivory and Pool color for each of my layers. I grabbed a piece of Navy-blue card stock for my back drop and set my focal point slightly above center. I cut a strip ¾ inches wide to stretch across the card front, but it will also separate the center of the Calen die cut from the outer ring! I then set the sentiment over the center circle and adhered my design panel onto my standard A2 size card base using my liquid adhesive and added a few ivory gems to add a bit of sparkle to our card! 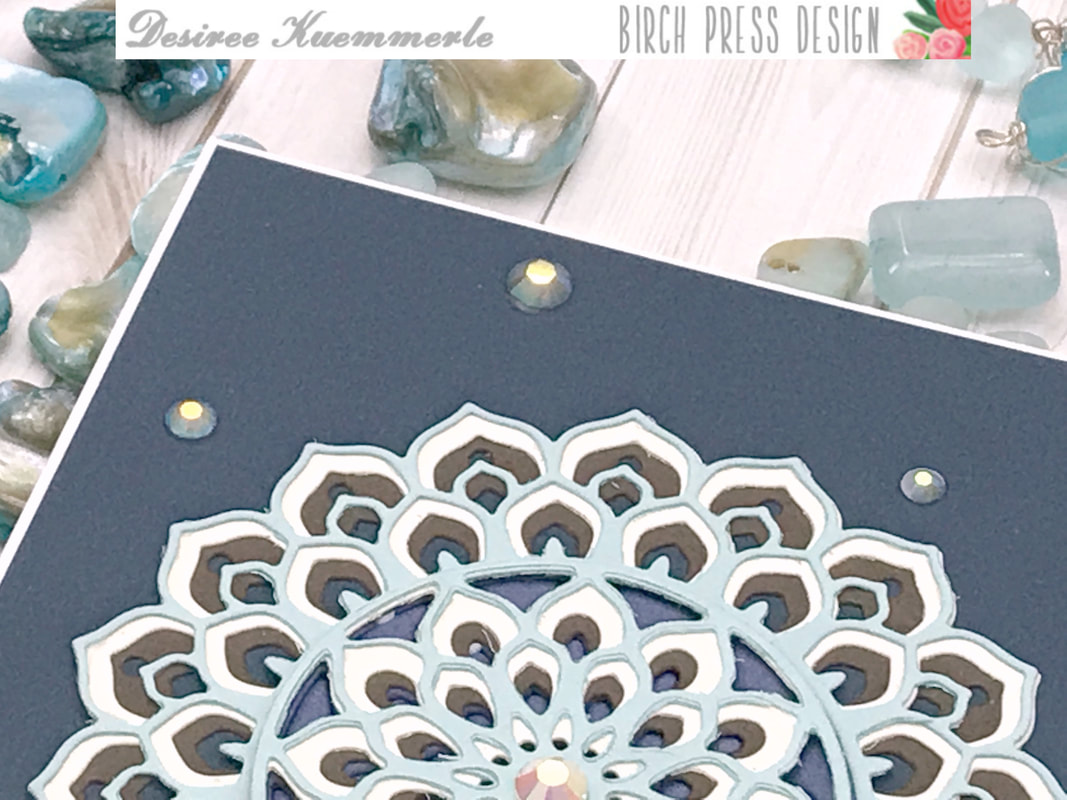 Here are just some of the products I used for this project... Birch Press Design – Calen Layering Die Set Birch Press Design – Believe Sugar Script Spellbinder Platinum 6 Die Cutting Machine Click the video below to see all the crafty details! When you are done watching the video, and want to see more, CLICK HERE to go to my YouTube Channel ...
Don’t’ forget to LIKE and SUBSCRIBE to my channel! Always Remember... Be Inspired, ENJOY, LAUGH and ALWAYS BE CREATIVE! ~ Desiree 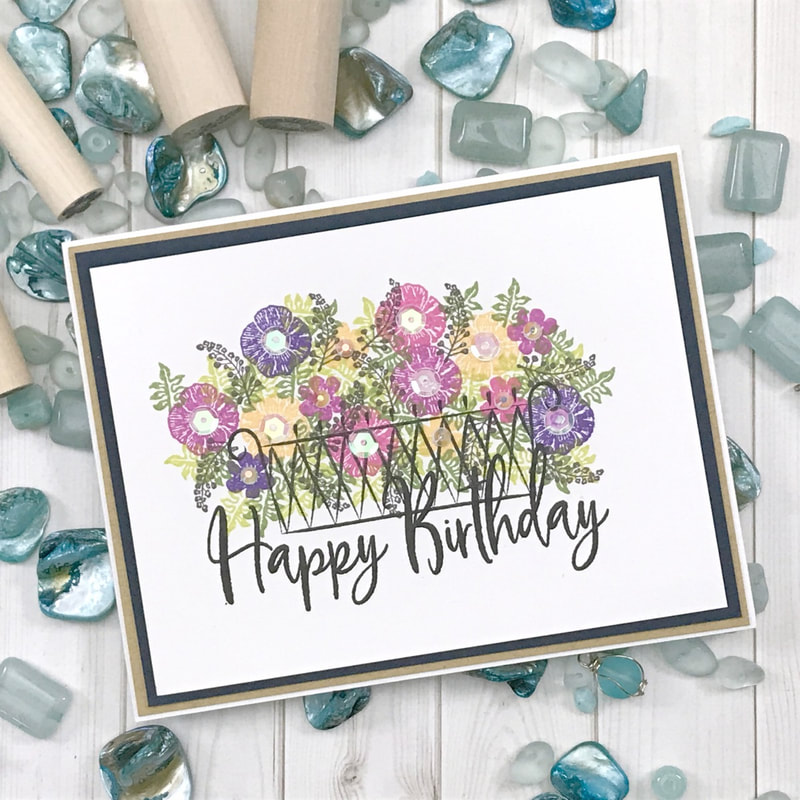 Hello Everyone! I am here today with Rubber Stamp Tapestry featuring their Poppy Wreath Peg Stamp Set! For today's project let's make a Birthday Card! ...and yes, let's try to bring Spring in faster... LOL... This set has 4 pegs, 2 poppy flowers, 1 leaf and 1 branch design... As always when I use my peg stamps I always grab for my memento dew drops! I think it has just become habit at this point! But I do enjoy the colors that Memento offers in their ink pads... 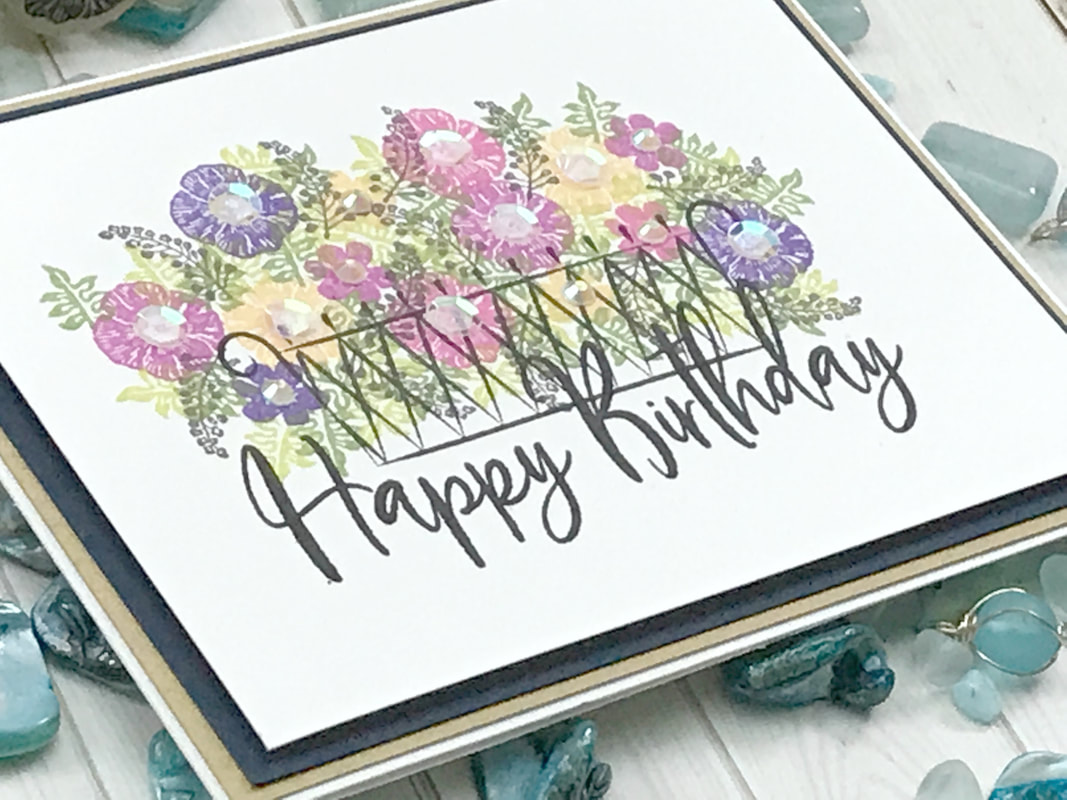 I also used their Wrought Iron Planter Rubber stamp set. I love these images, and they are a perfect match with peg stamp set! After I was done stamping my images, I used the Happy Birthday sentiment from their 'Happy' Clear Stamp set! If you are interested in any of the products I used just look below and they are listed - for a full list of products check out my video description! Here are just a few of the products used for this project... RST Peg Stamps – Poppy Wreath RST Rubber Stamp Set – Wrought Iron Planters RST Clear Stamp Set – Happy Memento Ink Dew Drop Sets – SNOW CONE Memento Ink Dew Drop Sets – GUM DROPS Memento Ink Dew Drop Sets – SORBET SCOOPS Click the video below to catch all the crafty goodness! When you are done watching the video, and want to see more, CLICK HERE to go to my YouTube Channel ...
Don’t’ forget to LIKE and SUBSCRIBE to my channel! Always Remember... Be Inspired, ENJOY, LAUGH and ALWAYS BE CREATIVE! ~ Desiree |

Getting Inky, suffering paper cuts, cutting using metal dies and stamping everything... These are just some of the fun and mischievous ways together we will create paper art! So stay and be motivated and inspired! ...and let me know what inspires your creativity!


Designer/Owner/Creator - Desiree
Well, hello there everyone! My name is Desiree Kuemmerle and I live in Lansdale, PA with the hubs of over 20 years and our furry bot Max! I am fluent in Crafting, a Master Paper Manipulator and a violator of all that makes sense...
Since about the time I spoke my first word, I’ve been an avid crafter alongside my mom and sister. You name the craft and I’ve probably bought it, collected it, tried it and finally stored it. Right now, getting Inky, suffering paper cuts, cutting with metal dies and stamping everything, whether it moves or not makes me smile and I must pass that along to everyone I know and don’t know! 
Inspiration Crafty Designs for...
 
DESIGN TEAM
Just a few Great places for all your CRAFTY needs!!!
 
Old Posts Never Die
November 2022
Search by Categories
All
|
 RSS Feed
SEARCH WEBSITEServiceslet's connect SOCIALLY! |
|
copyright!All content and designs included on my sites, social media and e-commerce webpages (i.e. Etsy, Facebook, ONLINE Courses and Website Store) are under COPYRIGHT © Desiree Kuemmerle, Include a Thank You, Desiree Tangles with Paper and Desiree Kuemmerle, CZT. Original artwork and designs are shared for your personal creations and inspiration only, unless otherwise stated by Desiree Kuemmerle.
© COPYRIGHT 2017-2024. by Desiree Tangles with Paper and (a.k.a.) Include a Thank You ...and then some! - Desiree Kuemmerle ALL RIGHTS RESERVED.
Include a Thank you
|