 Hello Everyone! Welcome back for Day 12 of my 2018 Christmas Series... Today I am featuring Penny Black Stamps and Hero Arts! Penny Black has always been a favorite stamp company of mine. There images are beautiful and perfect for any coloring medium... What their stamps also do is take the intimidation out of the picture... continue and you will see what I mean! 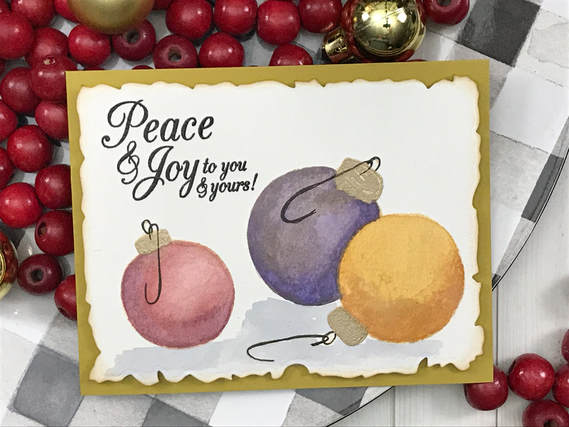 The stamp set I used today is called Adornments... I knew I wanted to water color them so I grabbed my QoR Water Colors... 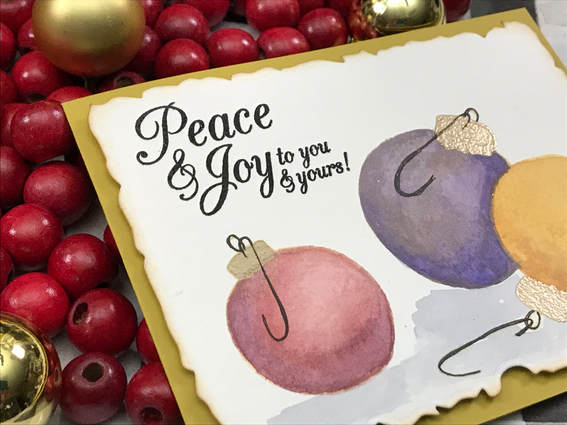 I bet looking at these you are thinking great watercolor technique... But I can tell you I am not a water colorist, this is all the stamps doing! Here are just some of the products used to make this card... Penny Black - Adornments Penny Black - Antique Frame Dies Hero Arts - Christmas Sentiments QoR Water Colors Click on the video below to see all the crafty details... With these stamps we can all water color! When you are done watching the video, and want to see more, CLICK HERE to go to my YouTube Channel ...
Don’t’ forget to LIKE and SUBSCRIBE to my channel! Always Remember... Be Inspired, Be Creative, ENJOY and SHARE what you create today! ~ Desiree
0 Comments
 Hello Everyone! Welcome Back for Day 10 of my Christmas Series! Today it is all about the tags and getting inky! When I combine tags and ink smooshing with distress oxides, I am in my creative heaven! I could make these ALL DAY LONG! So let's get started and remember HAVE FUN! 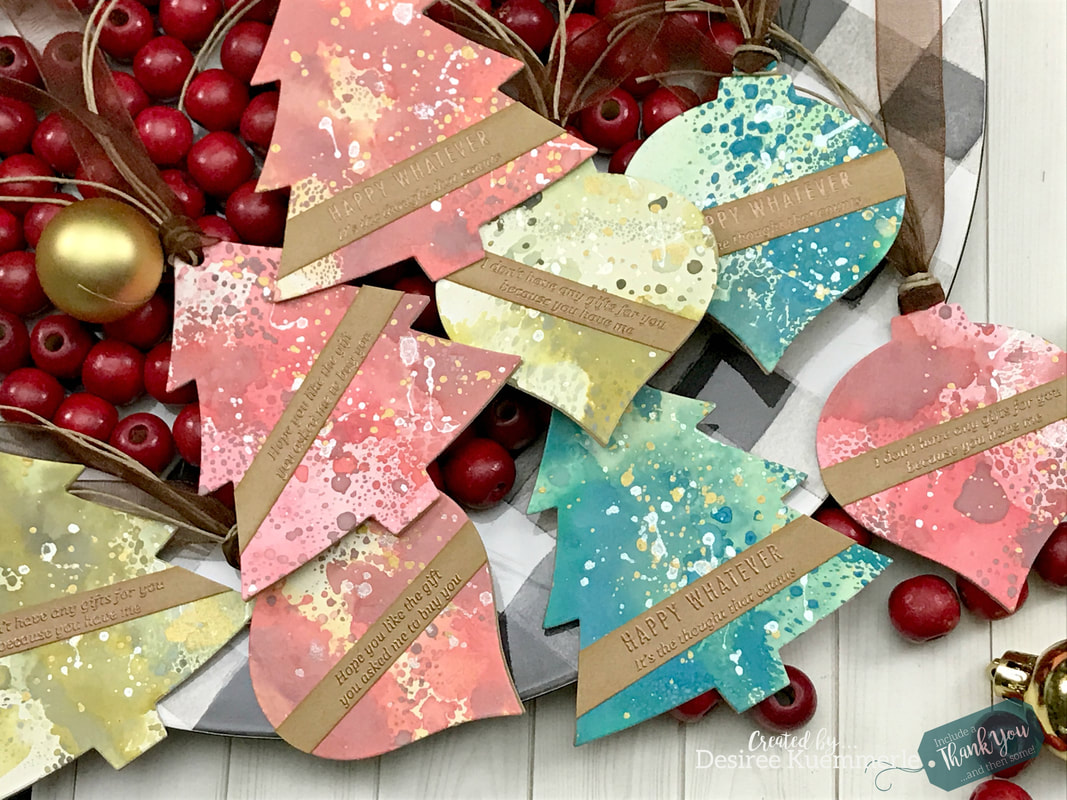 These were made using Hero Arts Fancy Dies in a tree and ornament shape... I always cut two so my tags can have layers to them... i then went to town ink smooshing EVERYTHING! (see the video for all the details...) 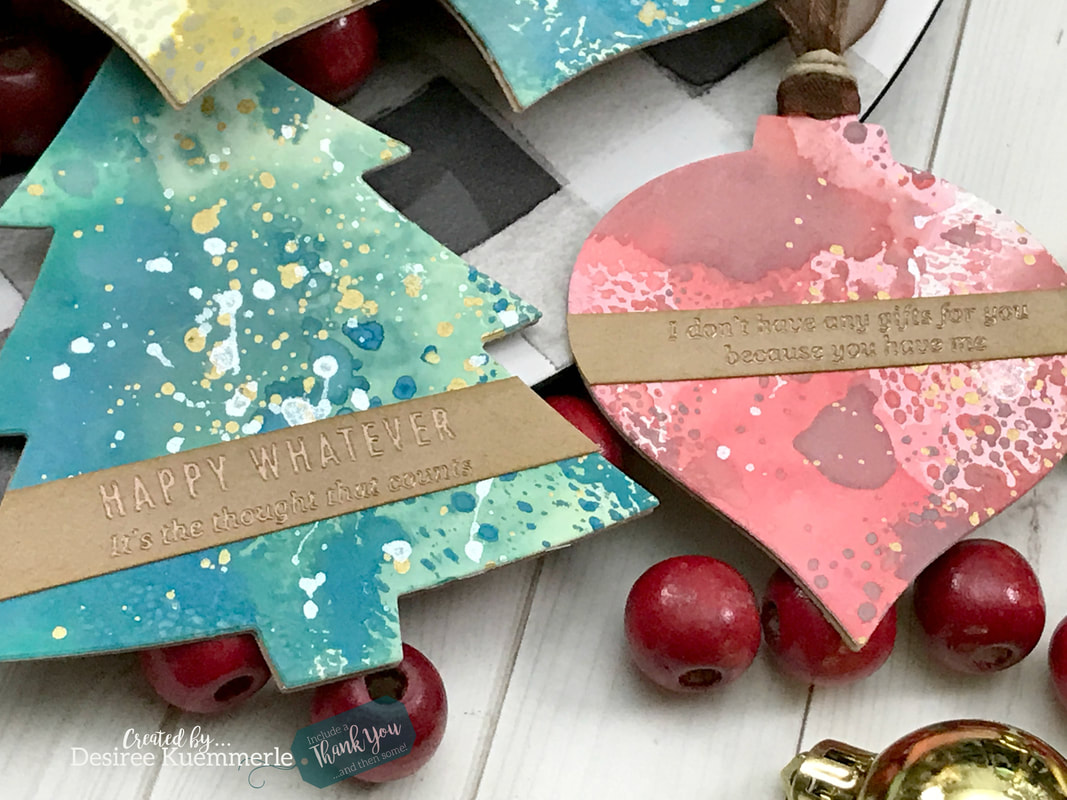 My sentiments were from a Hero Arts sentiment pack and it was perfect with some wonderful sarcasm! Now please, do not panic, I LOVE CHRISTMAS! 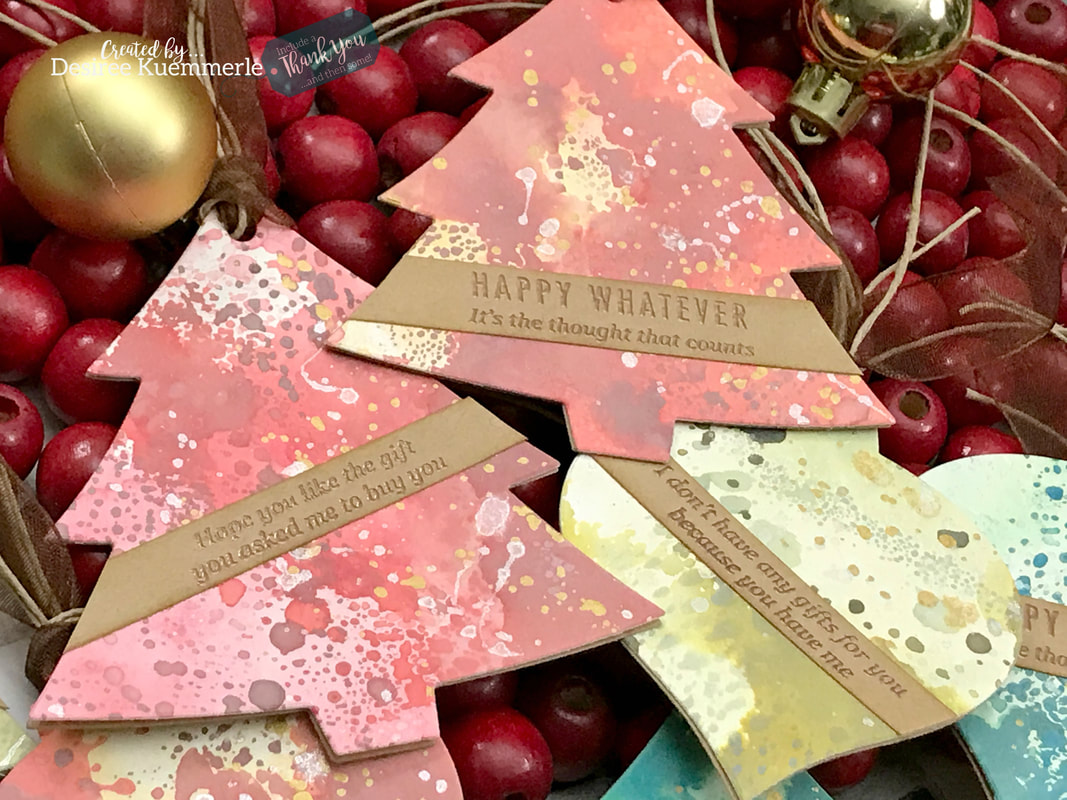 Finished all make tags off with long tassel that just give that extra touch! Here are some of the products used to make this project... Hero Arts Ornament Tag – Hero Arts Tree Tag – Hero Arts – Off Beat Holiday Messages – Distress Oxides Barn Door Abandoned Coral Dried Marigold Aged Mahogany Festive Berries Worn Lipstick Forest Moss Bundled Sage Old Pape Pine Needles Evergreen Bough Cracked Pistachio Click the video below to get all the inky and crafty details! When you are done watching the video, and want to see more, CLICK HERE to go to my YouTube Channel ...
Don’t’ forget to LIKE and SUBSCRIBE to my channel! Always Remember... Be Inspired, Be Creative, ENJOY and SHARE what you create today! ~ Desiree  Hello Everyone! Welcome for Day 9 of my 2018 Christmas Series Once again! I must admit I am absolutely enjoying each creation I made for this series! I hope you are getting a lot of inspiration for your holiday creations this year! For Day 9, I am focusing on Simon Says Stamp and Penny Black! I pulled out a back ground stamp called Snowflake Outline. This background is perfect for any medium you have in your stash or is your favorite to create with! 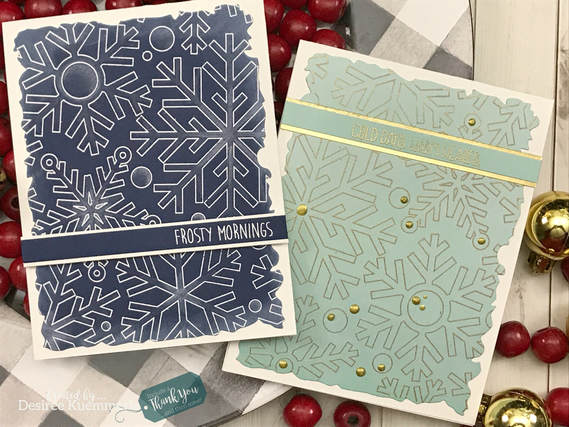 So I am going to use the same stamp and die sets for two cards, but you will see two completely different looks! 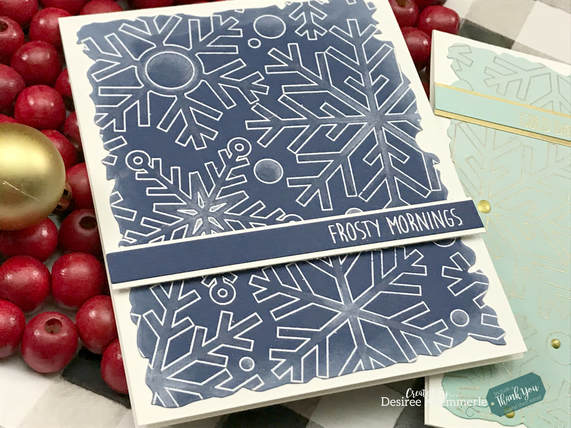 For card 1, used white embossing powder and a white pencil by Faber Castel... Simple, right? No need to color a solid image, but you definitely could! I chose a colorless blender pencil by Prismacolor to blend out the edges of my color line... Used a jagged edge die to make it is look like a frosted window added a sentiment, both from Penn Black and a hint of white pigment ink and there ya go! 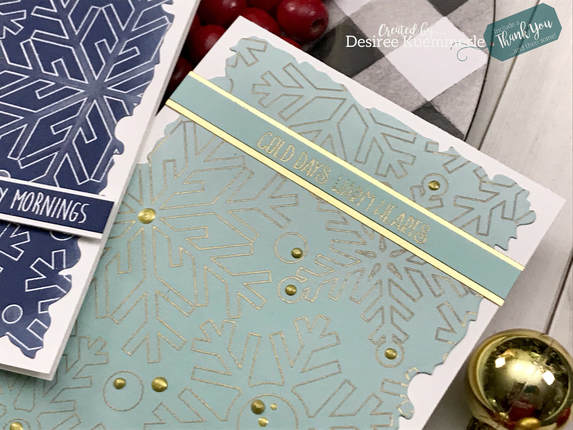 For Card 2, let use some gold embossing powder, add some ink to the bottom of the design. You can chose which way you want to add your color, I chose to use a blender brush and a plain sponge (nothing fancy)... added some white pigment ink to the top to smooth out my ink edge and also make the top lighter! Used the same frame die and sentiment set as my previous card.... Added a little bling to this card using some metallic paper and metallic drops for accents! Here are just a few of the supplies I used making these cards... SSS Snowflake Outline Background Stamp Penny Black Antique Frame Dies Penny Black Christmas Sentiments Tim Holtz 8 x 8 Paper Pad - Metallic Gold/Silver Click on the video below so you do miss any of the craft detail so you can make some for yourself! When you are done watching the video, and want to see more, CLICK HERE to go to my YouTube Channel ...
Don’t’ forget to LIKE and SUBSCRIBE to my channel! Always Remember... Be Inspired, Be Creative, ENJOY and SHARE what you create today! ~ Desiree  Hello Everyone! Welcome back for Day 8 of my 2018 Christmas Series! Today I am featuring My Favorite Things and Simon Says Stamp together! Now I have made a lot of tags, so lets get back to cards! For day 8 I am going to show you how you can make your own pattern paper and create 2 cards from 1 panel! Now dig into your stash and find that perfect die! This is one to have both a good negative and positive cut out! Not sure what I mean, just look below and see! 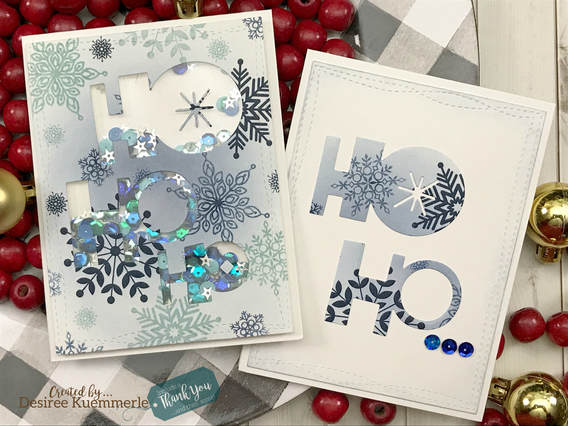 For these two cards I started out by making my background pattern using shades of blue ink. Once completed I added shading with my blender brushes... 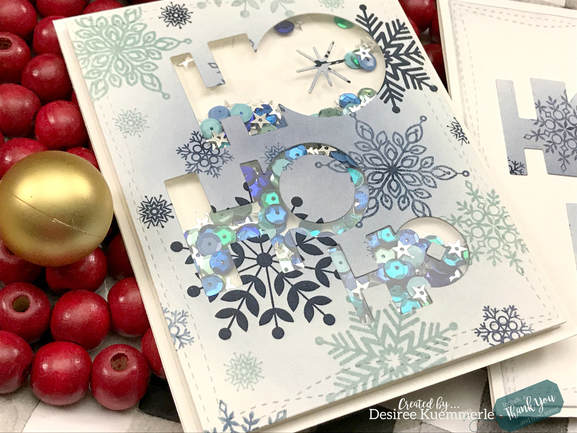 I then placed my frame and focal die in place and cut out my design. YES save all your pieces! For the card with the negative cut out We made a shaker card! 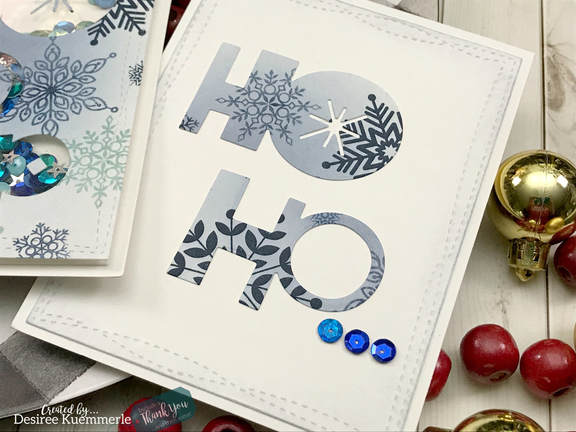 For the second card I used the cut outs and placed my sentiment on the front and continued it in the inside of the card! Here are just a few products used to make these cards... MFT - Wonky Stitched Rectangle Dies MFT - Ho Ho Ho Die SSS - Lots of Snowflakes Click the video below for all the craft details... of course some added tips and tricks along the way! When you are done watching the video, and want to see more, CLICK HERE to go to my YouTube Channel ...
Don’t’ forget to LIKE and SUBSCRIBE to my channel! Always Remember... Be Inspired, Be Creative, ENJOY and SHARE what you create today! ~ Desiree  Hello Everyone! Day 7 here and today I am featuring Avery Elle! I am still loving the tags here! So here I and going to show you with just some embossing powders and card stock you can make beautiful tags for all of your gift giving this season! For this project you can choose which color card stock is your favorite for the upcoming holiday season... Are you the traditional colors, or maybe some grey and pink... for me I love them all, but i most love the red, black, grey, gold and silver... yes lots of dark rich colors... but secretly I do love the hunter green and cobbler red and gold too! 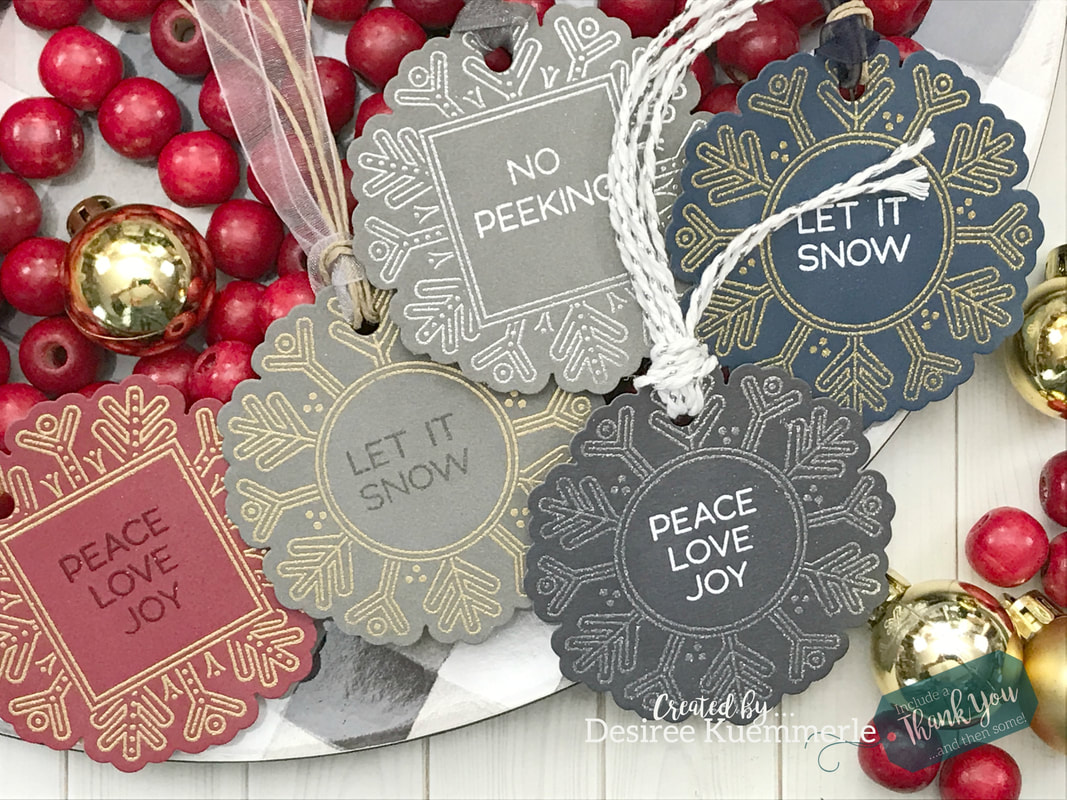 So many different combinations of embossing powders to card stock you can use... Make them all the same, Make them a matching card and gift set!... The possibilities are endless with this stamp and die set... 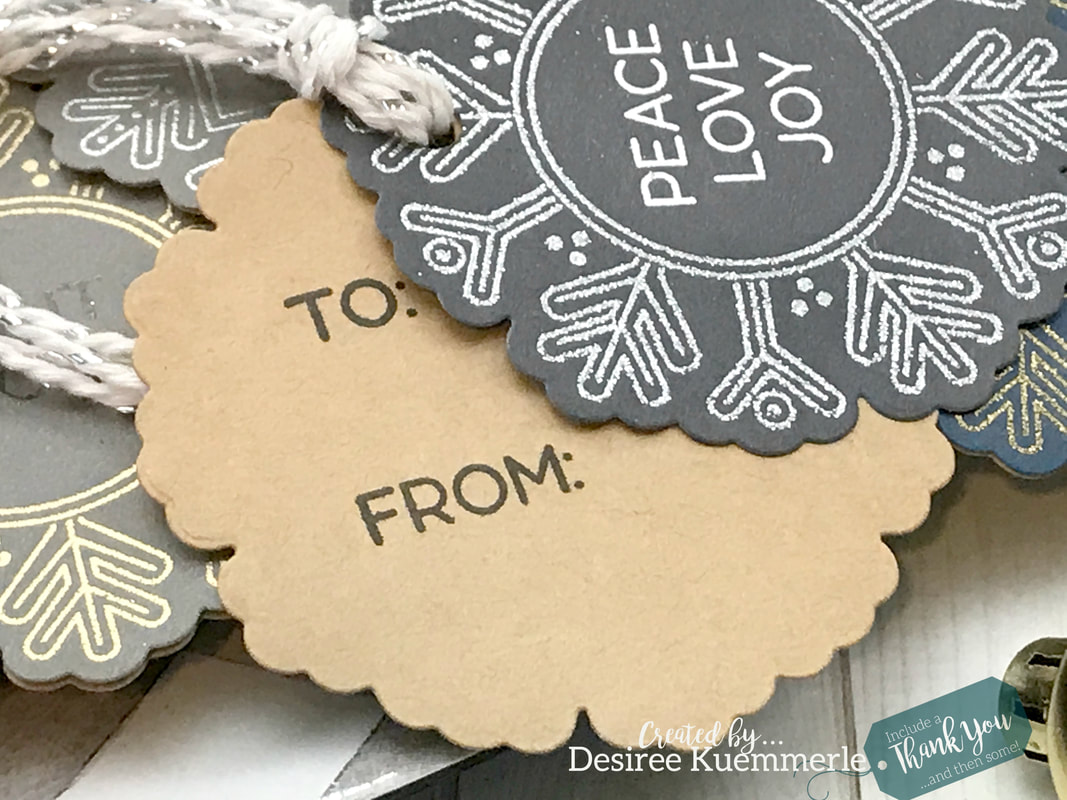 As Always I used two pieces of card stock for my tags, but this time no glue... With the tassel they will be able to be twisted apart! It is just another way to create your tags... 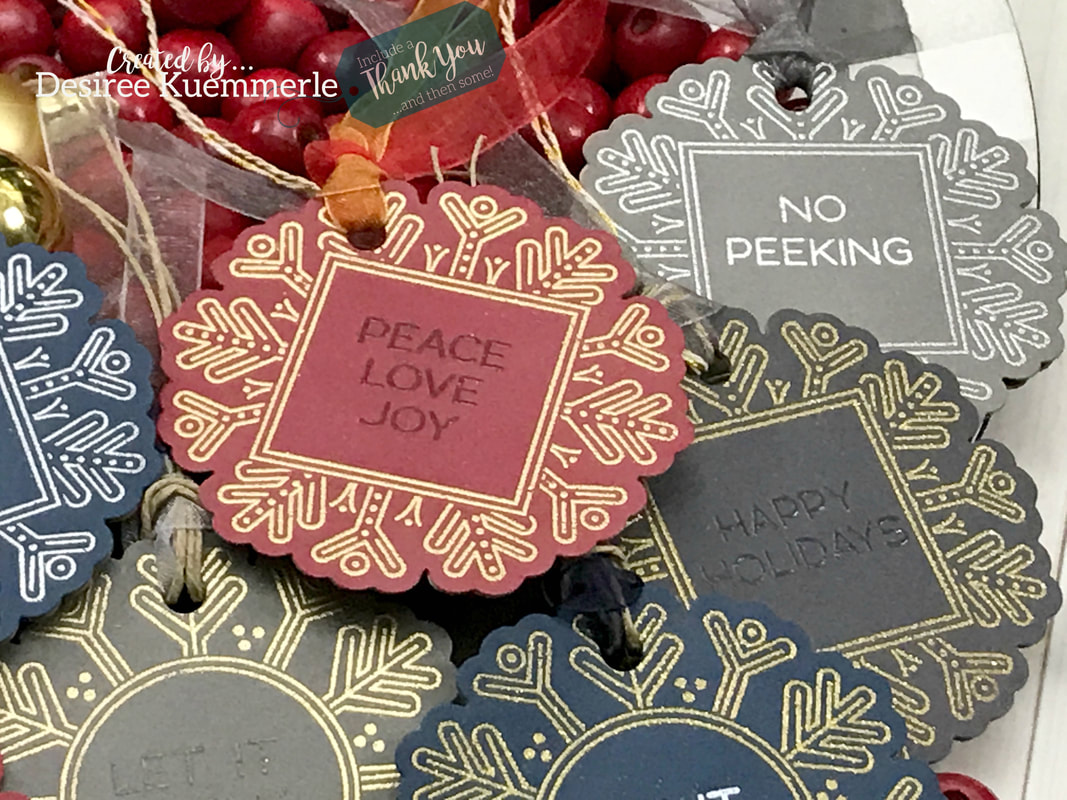 For my sentiments I chose to use mostly the white embossing powder so they could be easily seen, but sometimes it is nice to just use the versa mark ink and your clear embossing powder too! Which ever way you choose these tags will be center stage on all your gifts! Here are just some of the products used for this project... Avery Elle – Snow Tags Stamp Set Avery Elle – Snow Tags Die Set Versa Mark Ink Click the video below to get all the crafty details! When you are done watching the video, and want to see more, CLICK HERE to go to my YouTube Channel ...
Don’t’ forget to LIKE and SUBSCRIBE to my channel! Always Remember... Be Inspired, Be Creative, ENJOY and SHARE what you create today! ~ Desiree |

Getting Inky, suffering paper cuts, cutting using metal dies and stamping everything... These are just some of the fun and mischievous ways together we will create paper art! So stay and be motivated and inspired! ...and let me know what inspires your creativity!


Designer/Owner/Creator - Desiree
Well, hello there everyone! My name is Desiree Kuemmerle and I live in Lansdale, PA with the hubs of over 20 years and our furry bot Max! I am fluent in Crafting, a Master Paper Manipulator and a violator of all that makes sense...
Since about the time I spoke my first word, I’ve been an avid crafter alongside my mom and sister. You name the craft and I’ve probably bought it, collected it, tried it and finally stored it. Right now, getting Inky, suffering paper cuts, cutting with metal dies and stamping everything, whether it moves or not makes me smile and I must pass that along to everyone I know and don’t know! 
Inspiration Crafty Designs for...
 
DESIGN TEAM
Just a few Great places for all your CRAFTY needs!!!
 
Old Posts Never Die
November 2022
Search by Categories
All
|
 RSS Feed
SEARCH WEBSITEServiceslet's connect SOCIALLY! |
|
copyright!All content and designs included on my sites, social media and e-commerce webpages (i.e. Etsy, Facebook, ONLINE Courses and Website Store) are under COPYRIGHT © Desiree Kuemmerle, Include a Thank You, Desiree Tangles with Paper and Desiree Kuemmerle, CZT. Original artwork and designs are shared for your personal creations and inspiration only, unless otherwise stated by Desiree Kuemmerle.
© COPYRIGHT 2017-2024. by Desiree Tangles with Paper and (a.k.a.) Include a Thank You ...and then some! - Desiree Kuemmerle ALL RIGHTS RESERVED.
Include a Thank you
|